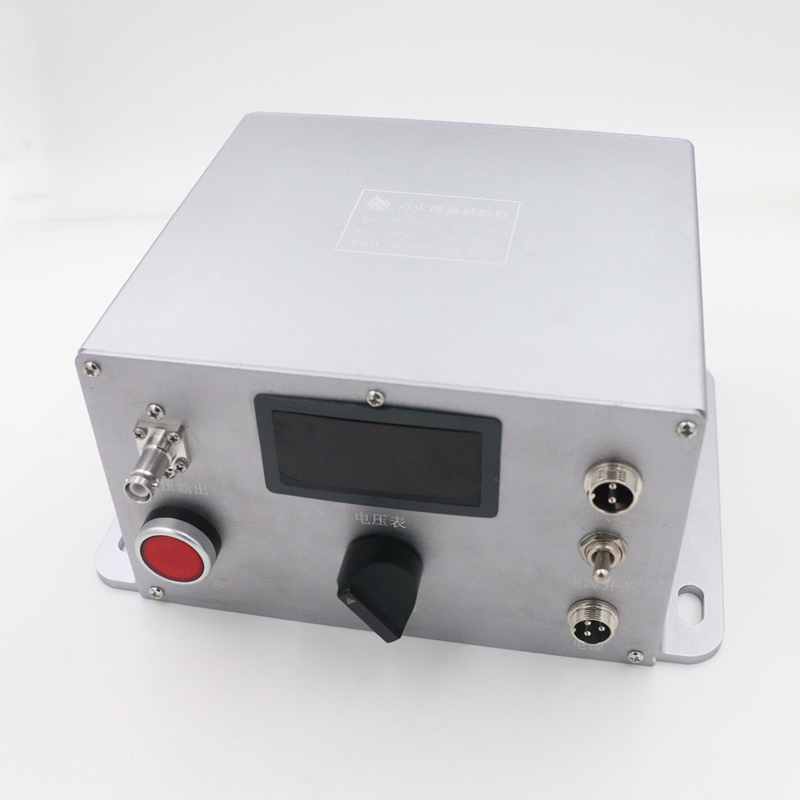

The Ignition Energy Test Bench TYST-1 is a laboratory instrument for setting a known ignition energy, discharging it into a test item, and recording what happened. It is an ignition energy measurement bench for combustion labs rather than a plant-floor igniter: energy is set to the value the experiment calls for and adjusted continuously, so no run has to be rounded to the nearest notch.
Labs usually face two poor choices here. One is to assemble a rig from a charger, a storage capacitor and a bench supply, then spend the first week of every project working out why two runs at the same setting behaved differently. The other is to buy a fixed-step unit and approach the interesting energy from above and below. This bench is built to avoid both — the charging and storage circuit, the setting control and the readout sit in one housing, so what the panel shows is what the test receives.
Owners are usually combustion and explosion research groups in universities and safety institutes, burner and engine developers checking an igniter design before it goes into a furnace, and laboratory managers replacing a hand-built rig with something the next student can repeat. Each unit is built to the purchaser's requirement, with the energy setting, connections and test interface agreed before manufacture, and the finished bench is checked against the technical standard named on the order.
| Product type | Laboratory ignition energy measurement bench for combustion labs, built to order |
| Energy setting | Set to the value the experiment requires, adjusted continuously |
| Control | Storage-voltage control with no fixed steps |
| Front panel | Voltage meter, rotary control, push-button test action, circular connectors |
| Enclosure | Sheet-metal housing, front-panel controls, base mounting flange |
| Build standard | Q/TYQ 01-2021 |
| Discharge | Fired from the panel into the connected test item |
| Typical use | Ignition research, explosion testing and comparable laboratory work |
| Installation | Bench-top unit fixed to a rigid laboratory bench |
| Configuration | Agreed per project before manufacture |
Every bench is quoted against a specification, so the first step is a short written requirement rather than a part number: what is being ignited, the span the storage voltage has to cover, how the test item connects, the supply available in your laboratory and the records your institution needs with the instrument. Send that and our engineers reply with a configuration and a price for it.
We work as a custom test bench solution supplier, so the commercial details follow the configuration you agree rather than a fixed catalogue line. Confirm with your sales contact the price and currency, the lead time against the current build schedule, the payment terms, the packing method, and the shipping terms and destination port. These vary with the specification and with where the bench is going, so they are quoted per order.
An instrument of this size normally travels crated, with the front panel and connectors protected and the enclosure secured to the crate base. Ask for the packing drawing in advance if your receiving department needs one, and tell us when the order is placed if the specification sheet has to be supplied in a particular format or language for your institute's records.
Questions that come up after delivery — siting, earthing, connecting a chamber, or interpreting a reading — go to the same engineers who configured the bench. If the instrument is going into a shared laboratory, arrange a review of your setup before the first live test.
Not every buyer arrives knowing which item in the range fits. Tell us what the part has to do, the space it goes into and the supply you have, and our engineers check it against the specifications we publish and tell you which model matches — and when a standard item will not do. The same team designs, builds and tests the products in our own plant in Shaanxi: 28 people, 16 patents, national high-tech enterprise status, in business since 2018. They answer questions before you order, stay reachable afterwards for fitting questions and fault-finding, and take custom or non-standard requests directly.
It is set continuously. The storage voltage is adjusted with the rotary control and read on the meter, so an experiment runs at the figure you chose rather than at the nearest available step. That is why research groups choose a continuously adjustable bench over a switched unit: the threshold you are hunting can be approached from either side in small increments, and every setting can be written down exactly as it was held.
All three are built to order for laboratory ignition work and differ in what the control is built around. This high energy ignition test bench is centred on continuous storage-voltage control, which suits work that cannot be rounded to fixed levels. The TYST-2 is arranged around selectable energy-storage setups with quick switching between levels, and the TYST-3 is built around adjustable discharge frequency. If your experiments vary energy finely, this is the one; if they vary the storage arrangement or the repetition rate, tell us and we will point you to the right bench.
It is the technical standard the bench is built and checked against, and it is the reference we quote in the specification. If your institute needs the standard cited in a purchase file or a methods section, use that designation, and tell us when the order is placed what wording your documentation requires.
Yes. The test interface is agreed before manufacture: electrode geometry, chamber connection and cable entry are all part of the specification, and the panel connectors are chosen to suit what you are bringing to the bench. As a custom test bench solution supplier we work from your description and, where you have one, a drawing or a sample of the fitting — which is how a bench ends up matching an existing chamber instead of forcing the chamber to match the bench.
Inside the range the bench was configured for, nothing needs to change: the control covers the span continuously, so a new set point is simply a new position on the knob. If the experiment moves outside that span, or the test interface itself changes, talk to us about reconfiguration and we will tell you what a change involves before anything is committed.


